
Running a business means you’re pressed for time. You find ways to squeeze every minute out of your day to get the most output but sometimes, there just aren’t enough hours in the day! Small businesses are in the particular position of having to manage their time to be as efficient as possible.
If you’re one of those business owners currently unhappy with your current phone service, then you might know what it’s like to spend too much time with phone malfunctions or customer service that doesn’t coincide with hours that are convenient for you. You’re battling choppy audio, customers are having a hard time reaching you, and employees can’t seem to use the functions efficiently.
You’re not crazy for dealing with these issues longer than you should. One of the reasons companies stick with a service provider they’re not satisfied with is because they don’t want to deal with the time and money it would take to get set up and learn a new software or system. In order to help you see how easy it can be to move on from your current provider, we have a step-by-step guide to show you how you can install new office phones in just a few easy steps.
This DIY office phone set up will show you how easy it is to install your hardware, without any IT experience or networking knowledge, while your new VoIP service provider does the rest. Once you make sure your business is ready for updated office phone systems, you can get started with your set up.
Here’s a breakdown of how you can set up your office phones in minutes:
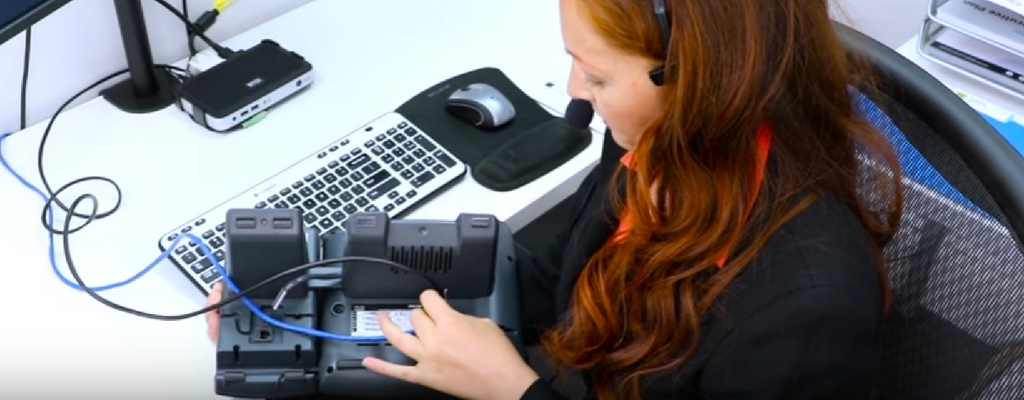
- When you receive the product, make sure you have all the pieces for a successful installation.
- Unplug one cat 5 cable from your computer and connect it to the SW port on the back of the phone; then take one end of the cat 5 cable that came with your phone and plug it into the computer port that you removed the first cable from and plug the other end to the PC port on the back of your phone.
- If necessary, assemble your power supply by attaching the plug clip until you hear a click.
- Plug in your power supply to the outlet first and then plug it into the power port, DC 5V.
- At this point, the phone should be powering up and begin working with your network. The display should show “Initializing.” Give it a few minutes to do its thing.
- Add the rest of the attachments for the phone.
- Plug in one end of the handset cord to the HAC port (under the SW port) and the other end to the bottom of the handset.
- You’re ready to go!
That was easy. Now you can make and receive calls and start using the features that will take your internal and external communications to the next level.
More DIY possibilities:
- Expand to More Phones
- Add Phone Numbers
- Record personalized away messages and voicemail greeting
- Change MP3 for music on hold
The Secret to Office Phone Systems
Did you know that not all office phone systems are created equal? That’s why finding the one that suits your business needs can feel like an endless carousel of duds. Small businesses have specific needs that depend on daily operations, preferred communication devices, and the size of the team; some professionals might not need to install new hardware because they use their cell phones to communicate, while others run larger operations and rely on seamless internal communication using an office phone model with more capacity.
FastPBX understands that every business is unique, that’s why we've created a technology that can be tailored to how you run your business. We make it easy to switch because we know you have daily challenges and need something quick, easy, and reliable. Ask our cloud specialists about our office phones and plans available. They’ll answer your questions and walk you through the solution that works for you.
Continue reading with one of these related posts

5 Ways You Can Prepare Your Business for The Covid Recovery
The Covid crisis has brought a major focus on the working from home trend. Due to this long-lasting pandemic, the world has started adopting newer means for running its businesses and keeping employees safe. Companies of all sizes have embraced technology and innovative systems to keep their businesses running. It is not as simple as it seems to be able to shift your business and adapt, so the ability to go online and integrate the most effective technologies available, is crucial to your success.
As the world gets vaccinated and things start to return to normal, here are a few ways how you can make sure your business can succeed with the "new normal".

3 VoIP Phone Features You Need to Impress Callers
There are resources all over the internet that tell you how to impress people face-to-face, but we’re here to talk about how you can use VoIP phone features to impress your callers.

How to Disaster-Proof Your Small Business
With Hurricane Irma threatening the East Coast and pummeling the Caribbean with winds of up to 180 MPH, residents and businesses owners are anxious about what kind of damage this category 5 hurricane might cause.

IVR Script Tips for Your Auto Attendant [Video]
As business owners continue to realize that communication trends are shifting from analog to VoIP, there is a growing need for producing a professional greeting for your auto attendant.